🎉 Start Shopify’s $1 Plan and We’ll pay you up to $3,600 just for starting! 💸 — Limited Time
Get Limited Time Offer 💰
Offer Details — Rewards require completing eligible third-party offers. Reward amounts vary from $30 to $3,600. Terms and eligibility restrictions apply.
🎉 Start Shopify’s $1 Plan and We’ll pay you up to $3,600 just for starting! 💸 — Limited Time
Get Limited Time Offer 💰
Offer Details — Rewards require completing eligible third-party offers. Reward amounts vary from $30 to $3,600. Terms and eligibility restrictions apply.
🎉 Start Shopify’s $1 Plan and We’ll pay you up to $3,600 just for starting! 💸 — Limited Time
Get Limited Time Offer 💰
Offer Details — Rewards require completing eligible third-party offers. Reward amounts vary from $30 to $3,600. Terms and eligibility restrictions apply.
Ecommerce Strategies
How to Automate Post-Purchase Emails in Shopify
How to Automate Post-Purchase Emails in Shopify

Automating post-purchase emails in Shopify is a smart way to stay connected with your customers and drive repeat purchases. Here's the key takeaway: Post-purchase emails generate 90% more revenue per recipient than standard campaigns and can significantly reduce manual efforts for new Shopify stores. Shopify’s built-in tools like Shopify Email and Shopify Flow make it easy to set up workflows that send order confirmations, shipping updates, and follow-ups - all tailored to customer behavior.
Key Points:
Why Automate? Save time and boost sales. Automated emails make up only 2% of email volume but drive 37% of sales.
Tools Needed: Shopify Email (free for 10,000 emails/month) and Shopify Flow (free for eligible plans).
Triggers to Use: Examples include "Order created" for thank-you emails or "Delivery completion" for review requests.
How It Works: Use Shopify’s trigger-condition-action system to send personalized emails at the right time.
Best Practices: Personalize content, time emails effectively (e.g., review requests 1–2 weeks after delivery), and include helpful details like product care guides or reordering reminders.
Start by setting up order confirmations and shipping updates, then expand to review requests, upsells, and loyalty offers. Shopify’s automation tools help you engage customers without extra effort, ensuring every interaction adds value to their experience.
How to Automate Email in Shopify After Order TEST
What You Need Before Setting Up Email Automation
Before diving into automated workflows, ensure your Shopify store meets a few essential criteria. To access automation features, your store must be on at least the Basic Shopify plan - these features are not available on the Starter plan. Additionally, the person setting up automations must have both "Marketing" and "Flow App" permissions enabled.
Check Your Shopify Store's Readiness
First, confirm that your store is on the correct plan and that customers have opted in to receive marketing emails by checking the "Accept Marketing" box during checkout. You’ll also need to install a cookie consent mechanism, as tracking customer behaviors - like abandoned carts - requires their consent to website cookies.
Keep in mind that building or editing custom automations requires a desktop device. While some basic automations, like cart abandonment workflows, can be managed on mobile, the full automation builder works exclusively on desktop.
Install Essential Apps and Tools
Shopify's email automation relies on two key apps: Shopify Flow and Shopify Email (sometimes referred to as Shopify Messaging).
Shopify Flow: This free app allows you to create custom automation workflows using triggers, conditions, and actions. With a 4.7/5 star rating from over 7,600 reviews, it's well-regarded for handling high-volume tasks, especially during busy sales periods like Black Friday.
Shopify Email: This app manages the design and delivery of your emails. It features a drag-and-drop editor and pre-built templates that automatically integrate your brand's logos and colors. Pricing is simple: the first 10,000 emails each month are free, and you’ll pay $1 for every additional 1,000 emails. Both apps are free to install for stores on eligible Shopify plans.
"Step one is to set up all your automation to make sure that when people sign up, there's something there to greet them."
Desirae Odjick, Product Marketing Lead, Shopify
Once these apps are installed, you’re ready to focus on crafting personalized email content.
Plan and Prepare Your Email Content
Start by mapping out your email journey. Think about key touchpoints like order confirmations, shipping updates, delivery notifications, and follow-ups such as review requests or care tips. Transactional emails should be straightforward, including details like order numbers and tracking links. On the other hand, marketing emails can bring extra value with how-to guides, loyalty rewards, or other engaging content.
Before setting up, gather your brand assets - logos, product images, and brand colors. Plan for personalization by deciding where to use dynamic tags, such as customer names, product details, or tailored recommendations. If you’re segmenting your audience (e.g., new customers versus repeat buyers), prepare unique content for each group. For instance, new customers might receive a welcome series introducing your brand, while loyal customers could get exclusive offers or rewards.
Timing is also key. Send review requests about 1–2 weeks after delivery and care instructions within 3–7 days of delivery. Having this content ready ahead of time ensures a smooth workflow launch without last-minute scrambling.
How to Set Up Automated Post-Purchase Emails
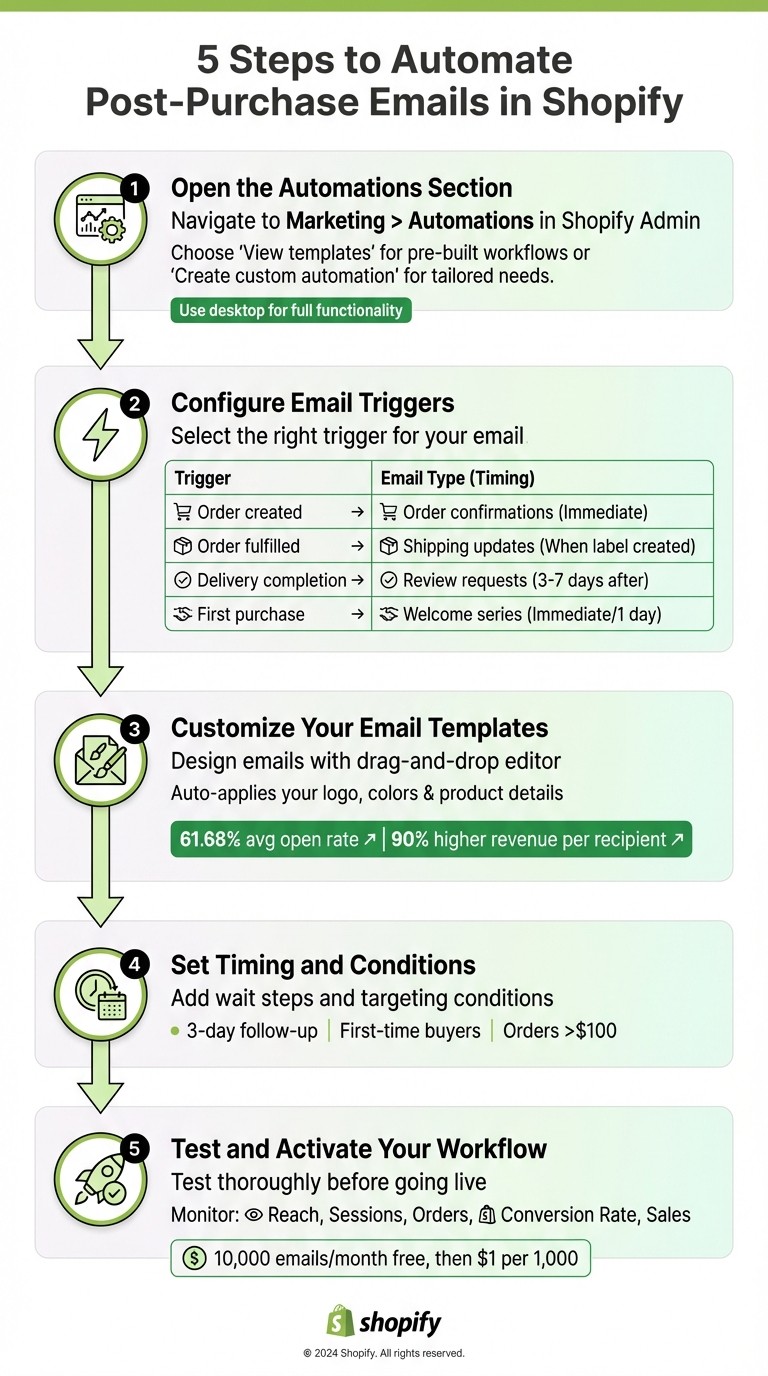
5-Step Guide to Setting Up Automated Post-Purchase Emails in Shopify
Once your store is ready and your content is prepared, it's time to set up automated post-purchase emails. Here's how you can launch your workflow efficiently using Shopify. Start by heading to Marketing > Automations in your Shopify admin. If you're on mobile, note that only limited automation features are available, so it's best to use a desktop for full functionality.
Step 1: Open the Automations Section
On the Automations page, you'll find two main options: View templates and Create custom automation. Templates are pre-designed workflows for common tasks like recovering abandoned carts or encouraging first-purchase upsells. For more tailored needs, select the custom option and use Shopify's "Trigger-Condition-Action" interface to build from scratch. If you're in a hurry, Shopify Sidekick can help you create workflows by simply describing what you want, like "Send a thank-you email when a customer's lifetime spend exceeds $1,000".
Step 2: Configure Email Triggers
Choose the right trigger to determine when your emails will send. For post-purchase emails, set "Order created" as the trigger to send messages right after checkout. If you're updating customers about shipping, use "Order fulfilled" - this activates when a shipping label is generated. For review requests or product care tips, select "Delivery completion" to ensure customers have received their items, typically 3–7 days after delivery. To avoid sending emails to high-risk orders, use the "Order risk analyzed" trigger.
Trigger Event | Recommended Use Case | Suggested Timing |
|---|---|---|
Order created | Order confirmation, thank-you messages, cross-sells | Immediate |
Order fulfilled | Shipping updates or "Your order is on the way" emails | When shipping label is created |
Delivery completion | Review requests, surveys, referral invites | 3–7 days after delivery |
First purchase | Welcome series, loyalty program onboarding | Immediate or 1 day later |
Step 3: Customize Your Email Templates
Once your trigger is set, design your email using Shopify's drag-and-drop editor. This tool makes it easy to arrange text, images, buttons, and even videos. Shopify automatically applies your store's logo, colors, and product details to keep everything consistent with your brand. You can also use Shopify Magic or Sidekick to instantly generate subject lines and email body text that align with your brand.
For product recommendations, choose between "Static" sections (manually selected items) or "Dynamic" sections that automatically showcase best sellers or new arrivals. To boost engagement, add Express Checkout buttons so customers can buy directly from the email, or include a countdown timer to create urgency for limited-time offers. Post-purchase emails are incredibly effective, with a 61.68% average open rate and 90% higher revenue per recipient compared to standard campaigns.
"Strong copywriting is essential if you want people to remember you after reading your emails." - Robert Warner, Head of Marketing at VirtualValley
Always preview and test your email before activating it.
Step 4: Set Timing and Conditions
Add wait steps to space out your messages - like a follow-up three days after purchase - and set conditions to target specific customer segments. For example, you can send targeted emails to first-time buyers or customers whose orders exceed $100. Keep in mind that Shopify Email automations only send to customers who have opted into marketing. Once timing and conditions are configured, double-check everything to ensure your workflow is ready.
Step 5: Test and Activate Your Workflow
Before going live, test your automation thoroughly. Use the "Test workflow" feature or send yourself a test email to confirm everything looks and works as intended. Make sure there are no conflicts with other automations to avoid sending duplicate emails, like two different welcome series. When you're satisfied, click Turn on automation to activate it.
Once the workflow is live, monitor its performance using metrics like Reach (emails sent), Sessions (store visits from the email), Orders, Conversion Rate, and Sales. Shopify allows you to send up to 10,000 emails per month for free, with additional emails costing $1.00 per 1,000.
Best Practices for Post-Purchase Emails
When setting up an automated post-purchase workflow, focusing on key elements like personalization, timing, and added value can make a big difference. These factors influence whether customers open your emails, engage with your brand, and, most importantly, come back for more.
Personalization and Branding
Make your emails feel personal and aligned with your brand. Start with small but impactful touches, like addressing the customer by name in the subject line and email body. Reference their specific purchase to show you’re paying attention - if someone bought running shoes, suggest related items like socks or belts.
"Implementing segments that identify patterns in your high-value purchasers - what they buy, where they are, how much they spend, how often they return... will significantly improve the performance of your post-purchase email campaigns" - Jack Bird, Director at Let's Drive Digital
Your branding should also shine through. Use your logo, brand colors, and fonts consistently, and ensure the tone matches your brand’s personality. Dynamic content, such as real-time order tracking, can further enhance the customer experience.
Once you’ve nailed personalization, timing is the next key piece of the puzzle.
Timing and Frequency
Hitting the right timing with your emails builds trust and keeps customers engaged. Start with immediate confirmations and shipping updates. Then, around 3–7 days after delivery, send product usage tips or care instructions. For review requests, wait 1–2 weeks so customers have time to use the product.
A simple follow-up a week after shipping can also work wonders. As Cody Candee, Founder and CEO of Bounce, explains:
"By sending a post-purchase email a week after shipping... not only does it show your concern that the customer's needs were met, but it also provides you the opportunity to promote similar products" - Cody Candee, Founder and CEO of Bounce
However, balance is key. Sending too many emails or waiting too long can lead to unsubscribes or missed opportunities.
Now let’s talk about what makes each email worth opening.
Include Helpful Content in Every Email
Post-purchase emails should do more than confirm orders - they should guide customers on what to do next. Provide care instructions, setup guides, or video tutorials tailored to the product. For instance, skincare brands could explain application routines, while electronics sellers might include quick-start videos.
"A post-purchase campaign should have details about the order, but it also should answer the 'What next?' questions that customers often have" - Kim Foerst, Digital Marketing Manager at Lush Decor
To encourage engagement, consider adding incentives like discounts or loyalty points for completing surveys or leaving reviews. For consumable products, timely reminders for reordering can keep customers coming back. Cross-selling is another smart move - it can boost sales by 20% and profits by 30%. Lastly, always include clear customer service details and links to your FAQ page, so help is just a click away.
Conclusion
Automating post-purchase emails on Shopify can completely change how you engage with your customers. By using the Automations section in your Shopify Admin, you can set up behavioral triggers like "Order created" or "Fulfilled order", personalize email templates, and control timing with wait blocks. This lets you replace manual follow-ups with a system that can handle anywhere from 10 to 100,000 customers effortlessly.
This approach doesn’t just save time - it delivers results. Automated emails boast 52% higher open rates and can achieve up to a 2,361% increase in conversion rates compared to typical email campaigns. These emails are designed to engage customers with fewer messages, whether it’s sending order confirmations, shipping updates, or useful product tips. The result? Building trust and turning one-time buyers into loyal customers.
The financial impact is equally impressive. Post-purchase emails generate 90% more revenue per recipient than standard campaigns. Plus, email marketing as a whole delivers an average ROI of 36x. For example, in 2025, Doe Lashes saved over $30,000 each month by automating 80% of its repetitive marketing tasks using Shopify Flow. Similarly, FUNNYFUZZY, a pet supply retailer, saw a 40% boost in conversions and a 30% increase in average order value.
To get started, focus on the essentials like order confirmations, shipping updates, and thank-you emails. Once you’re comfortable, you can expand to include review requests and product recommendations. Shopify Messaging even offers 10,000 free emails per month, making it easy to dive in. Each automated email not only strengthens customer relationships but also drives repeat purchases - all without adding to your workload.
FAQs
Which Shopify plan do I need for post-purchase email automation?
To set up automated post-purchase emails, you'll need a Shopify plan that includes support for marketing automations - like the Shopify Plus plan. You can create these automations using Shopify Messaging or by integrating third-party apps found on the Automations page.
Why aren’t my automated emails sending to some customers?
Automated emails sometimes fail to reach specific customers due to factors like incorrect triggers - such as abandoned carts - or improperly set up workflows. To address this, double-check your automation settings to ensure the trigger conditions align with customer behavior. Also, take the time to confirm there are no technical glitches disrupting the process.
How do I prevent duplicate or conflicting automations?
To keep your Shopify automations running smoothly, make sure each workflow is built with unique triggers and conditions. Overlapping workflows can create confusion or even conflict. A good habit is to routinely review and tidy up your automations within the Shopify admin or Flow app. If you spot any workflows that overlap, disable them to avoid complications.
Before rolling out a new workflow, test it thoroughly. This step can help you catch any potential conflicts early. Staying organized and keeping a close eye on your automated email workflows will save you from unnecessary headaches down the line.
Related Blog Posts
Automating post-purchase emails in Shopify is a smart way to stay connected with your customers and drive repeat purchases. Here's the key takeaway: Post-purchase emails generate 90% more revenue per recipient than standard campaigns and can significantly reduce manual efforts for new Shopify stores. Shopify’s built-in tools like Shopify Email and Shopify Flow make it easy to set up workflows that send order confirmations, shipping updates, and follow-ups - all tailored to customer behavior.
Key Points:
Why Automate? Save time and boost sales. Automated emails make up only 2% of email volume but drive 37% of sales.
Tools Needed: Shopify Email (free for 10,000 emails/month) and Shopify Flow (free for eligible plans).
Triggers to Use: Examples include "Order created" for thank-you emails or "Delivery completion" for review requests.
How It Works: Use Shopify’s trigger-condition-action system to send personalized emails at the right time.
Best Practices: Personalize content, time emails effectively (e.g., review requests 1–2 weeks after delivery), and include helpful details like product care guides or reordering reminders.
Start by setting up order confirmations and shipping updates, then expand to review requests, upsells, and loyalty offers. Shopify’s automation tools help you engage customers without extra effort, ensuring every interaction adds value to their experience.
How to Automate Email in Shopify After Order TEST
What You Need Before Setting Up Email Automation
Before diving into automated workflows, ensure your Shopify store meets a few essential criteria. To access automation features, your store must be on at least the Basic Shopify plan - these features are not available on the Starter plan. Additionally, the person setting up automations must have both "Marketing" and "Flow App" permissions enabled.
Check Your Shopify Store's Readiness
First, confirm that your store is on the correct plan and that customers have opted in to receive marketing emails by checking the "Accept Marketing" box during checkout. You’ll also need to install a cookie consent mechanism, as tracking customer behaviors - like abandoned carts - requires their consent to website cookies.
Keep in mind that building or editing custom automations requires a desktop device. While some basic automations, like cart abandonment workflows, can be managed on mobile, the full automation builder works exclusively on desktop.
Install Essential Apps and Tools
Shopify's email automation relies on two key apps: Shopify Flow and Shopify Email (sometimes referred to as Shopify Messaging).
Shopify Flow: This free app allows you to create custom automation workflows using triggers, conditions, and actions. With a 4.7/5 star rating from over 7,600 reviews, it's well-regarded for handling high-volume tasks, especially during busy sales periods like Black Friday.
Shopify Email: This app manages the design and delivery of your emails. It features a drag-and-drop editor and pre-built templates that automatically integrate your brand's logos and colors. Pricing is simple: the first 10,000 emails each month are free, and you’ll pay $1 for every additional 1,000 emails. Both apps are free to install for stores on eligible Shopify plans.
"Step one is to set up all your automation to make sure that when people sign up, there's something there to greet them."
Desirae Odjick, Product Marketing Lead, Shopify
Once these apps are installed, you’re ready to focus on crafting personalized email content.
Plan and Prepare Your Email Content
Start by mapping out your email journey. Think about key touchpoints like order confirmations, shipping updates, delivery notifications, and follow-ups such as review requests or care tips. Transactional emails should be straightforward, including details like order numbers and tracking links. On the other hand, marketing emails can bring extra value with how-to guides, loyalty rewards, or other engaging content.
Before setting up, gather your brand assets - logos, product images, and brand colors. Plan for personalization by deciding where to use dynamic tags, such as customer names, product details, or tailored recommendations. If you’re segmenting your audience (e.g., new customers versus repeat buyers), prepare unique content for each group. For instance, new customers might receive a welcome series introducing your brand, while loyal customers could get exclusive offers or rewards.
Timing is also key. Send review requests about 1–2 weeks after delivery and care instructions within 3–7 days of delivery. Having this content ready ahead of time ensures a smooth workflow launch without last-minute scrambling.
How to Set Up Automated Post-Purchase Emails
5-Step Guide to Setting Up Automated Post-Purchase Emails in Shopify
Once your store is ready and your content is prepared, it's time to set up automated post-purchase emails. Here's how you can launch your workflow efficiently using Shopify. Start by heading to Marketing > Automations in your Shopify admin. If you're on mobile, note that only limited automation features are available, so it's best to use a desktop for full functionality.
Step 1: Open the Automations Section
On the Automations page, you'll find two main options: View templates and Create custom automation. Templates are pre-designed workflows for common tasks like recovering abandoned carts or encouraging first-purchase upsells. For more tailored needs, select the custom option and use Shopify's "Trigger-Condition-Action" interface to build from scratch. If you're in a hurry, Shopify Sidekick can help you create workflows by simply describing what you want, like "Send a thank-you email when a customer's lifetime spend exceeds $1,000".
Step 2: Configure Email Triggers
Choose the right trigger to determine when your emails will send. For post-purchase emails, set "Order created" as the trigger to send messages right after checkout. If you're updating customers about shipping, use "Order fulfilled" - this activates when a shipping label is generated. For review requests or product care tips, select "Delivery completion" to ensure customers have received their items, typically 3–7 days after delivery. To avoid sending emails to high-risk orders, use the "Order risk analyzed" trigger.
Trigger Event | Recommended Use Case | Suggested Timing |
|---|---|---|
Order created | Order confirmation, thank-you messages, cross-sells | Immediate |
Order fulfilled | Shipping updates or "Your order is on the way" emails | When shipping label is created |
Delivery completion | Review requests, surveys, referral invites | 3–7 days after delivery |
First purchase | Welcome series, loyalty program onboarding | Immediate or 1 day later |
Step 3: Customize Your Email Templates
Once your trigger is set, design your email using Shopify's drag-and-drop editor. This tool makes it easy to arrange text, images, buttons, and even videos. Shopify automatically applies your store's logo, colors, and product details to keep everything consistent with your brand. You can also use Shopify Magic or Sidekick to instantly generate subject lines and email body text that align with your brand.
For product recommendations, choose between "Static" sections (manually selected items) or "Dynamic" sections that automatically showcase best sellers or new arrivals. To boost engagement, add Express Checkout buttons so customers can buy directly from the email, or include a countdown timer to create urgency for limited-time offers. Post-purchase emails are incredibly effective, with a 61.68% average open rate and 90% higher revenue per recipient compared to standard campaigns.
"Strong copywriting is essential if you want people to remember you after reading your emails." - Robert Warner, Head of Marketing at VirtualValley
Always preview and test your email before activating it.
Step 4: Set Timing and Conditions
Add wait steps to space out your messages - like a follow-up three days after purchase - and set conditions to target specific customer segments. For example, you can send targeted emails to first-time buyers or customers whose orders exceed $100. Keep in mind that Shopify Email automations only send to customers who have opted into marketing. Once timing and conditions are configured, double-check everything to ensure your workflow is ready.
Step 5: Test and Activate Your Workflow
Before going live, test your automation thoroughly. Use the "Test workflow" feature or send yourself a test email to confirm everything looks and works as intended. Make sure there are no conflicts with other automations to avoid sending duplicate emails, like two different welcome series. When you're satisfied, click Turn on automation to activate it.
Once the workflow is live, monitor its performance using metrics like Reach (emails sent), Sessions (store visits from the email), Orders, Conversion Rate, and Sales. Shopify allows you to send up to 10,000 emails per month for free, with additional emails costing $1.00 per 1,000.
Best Practices for Post-Purchase Emails
When setting up an automated post-purchase workflow, focusing on key elements like personalization, timing, and added value can make a big difference. These factors influence whether customers open your emails, engage with your brand, and, most importantly, come back for more.
Personalization and Branding
Make your emails feel personal and aligned with your brand. Start with small but impactful touches, like addressing the customer by name in the subject line and email body. Reference their specific purchase to show you’re paying attention - if someone bought running shoes, suggest related items like socks or belts.
"Implementing segments that identify patterns in your high-value purchasers - what they buy, where they are, how much they spend, how often they return... will significantly improve the performance of your post-purchase email campaigns" - Jack Bird, Director at Let's Drive Digital
Your branding should also shine through. Use your logo, brand colors, and fonts consistently, and ensure the tone matches your brand’s personality. Dynamic content, such as real-time order tracking, can further enhance the customer experience.
Once you’ve nailed personalization, timing is the next key piece of the puzzle.
Timing and Frequency
Hitting the right timing with your emails builds trust and keeps customers engaged. Start with immediate confirmations and shipping updates. Then, around 3–7 days after delivery, send product usage tips or care instructions. For review requests, wait 1–2 weeks so customers have time to use the product.
A simple follow-up a week after shipping can also work wonders. As Cody Candee, Founder and CEO of Bounce, explains:
"By sending a post-purchase email a week after shipping... not only does it show your concern that the customer's needs were met, but it also provides you the opportunity to promote similar products" - Cody Candee, Founder and CEO of Bounce
However, balance is key. Sending too many emails or waiting too long can lead to unsubscribes or missed opportunities.
Now let’s talk about what makes each email worth opening.
Include Helpful Content in Every Email
Post-purchase emails should do more than confirm orders - they should guide customers on what to do next. Provide care instructions, setup guides, or video tutorials tailored to the product. For instance, skincare brands could explain application routines, while electronics sellers might include quick-start videos.
"A post-purchase campaign should have details about the order, but it also should answer the 'What next?' questions that customers often have" - Kim Foerst, Digital Marketing Manager at Lush Decor
To encourage engagement, consider adding incentives like discounts or loyalty points for completing surveys or leaving reviews. For consumable products, timely reminders for reordering can keep customers coming back. Cross-selling is another smart move - it can boost sales by 20% and profits by 30%. Lastly, always include clear customer service details and links to your FAQ page, so help is just a click away.
Conclusion
Automating post-purchase emails on Shopify can completely change how you engage with your customers. By using the Automations section in your Shopify Admin, you can set up behavioral triggers like "Order created" or "Fulfilled order", personalize email templates, and control timing with wait blocks. This lets you replace manual follow-ups with a system that can handle anywhere from 10 to 100,000 customers effortlessly.
This approach doesn’t just save time - it delivers results. Automated emails boast 52% higher open rates and can achieve up to a 2,361% increase in conversion rates compared to typical email campaigns. These emails are designed to engage customers with fewer messages, whether it’s sending order confirmations, shipping updates, or useful product tips. The result? Building trust and turning one-time buyers into loyal customers.
The financial impact is equally impressive. Post-purchase emails generate 90% more revenue per recipient than standard campaigns. Plus, email marketing as a whole delivers an average ROI of 36x. For example, in 2025, Doe Lashes saved over $30,000 each month by automating 80% of its repetitive marketing tasks using Shopify Flow. Similarly, FUNNYFUZZY, a pet supply retailer, saw a 40% boost in conversions and a 30% increase in average order value.
To get started, focus on the essentials like order confirmations, shipping updates, and thank-you emails. Once you’re comfortable, you can expand to include review requests and product recommendations. Shopify Messaging even offers 10,000 free emails per month, making it easy to dive in. Each automated email not only strengthens customer relationships but also drives repeat purchases - all without adding to your workload.
FAQs
Which Shopify plan do I need for post-purchase email automation?
To set up automated post-purchase emails, you'll need a Shopify plan that includes support for marketing automations - like the Shopify Plus plan. You can create these automations using Shopify Messaging or by integrating third-party apps found on the Automations page.
Why aren’t my automated emails sending to some customers?
Automated emails sometimes fail to reach specific customers due to factors like incorrect triggers - such as abandoned carts - or improperly set up workflows. To address this, double-check your automation settings to ensure the trigger conditions align with customer behavior. Also, take the time to confirm there are no technical glitches disrupting the process.
How do I prevent duplicate or conflicting automations?
To keep your Shopify automations running smoothly, make sure each workflow is built with unique triggers and conditions. Overlapping workflows can create confusion or even conflict. A good habit is to routinely review and tidy up your automations within the Shopify admin or Flow app. If you spot any workflows that overlap, disable them to avoid complications.
Before rolling out a new workflow, test it thoroughly. This step can help you catch any potential conflicts early. Staying organized and keeping a close eye on your automated email workflows will save you from unnecessary headaches down the line.
Related Blog Posts
Get your store!
© 2025 BuildMyStores
© 2025 BuildMyStores